Starting with JRuby with rails on appengine I think is quite a lot of new on new kind of technology. I'm therefore at the moment just focusing on learning Ruby on Rails, and then the plan is to migrate off the rails, and then back onto the rails on appengine.
Currently I'm going through the online tutorial at http://railstutorial.org which I'm finding is excellent!
Wednesday, September 1, 2010
Tuesday, August 31, 2010
Getting Java, JRuby Setup on linux
Now that we have our Virtual Machine it's time to get Java, Eclipse, JRuby, and App-Engine set up.


Note: At the time of writing this (September 2010, I had to install the 1.8 version of rubygems, as the 1.9.x version didn't work properly (gave loads of errors when following the tutorial).
Type the following into the terminal:
If that command didn't show you a whole heap of options, then you're going to need to update your path variable to tell the system where the appcfg.rb file is:
Open the Terminal (Applications -> Accessories -> Terminal)
Type the following command to open the .bashrc file in the gedit text editor:
Follow the rest of the tutorial at http://code.google.com/p/appengine-jruby/wiki/CreateApp to create a working hello world app on AppEngine! (your webpage should say "hello" if you are successful)


- Install Java
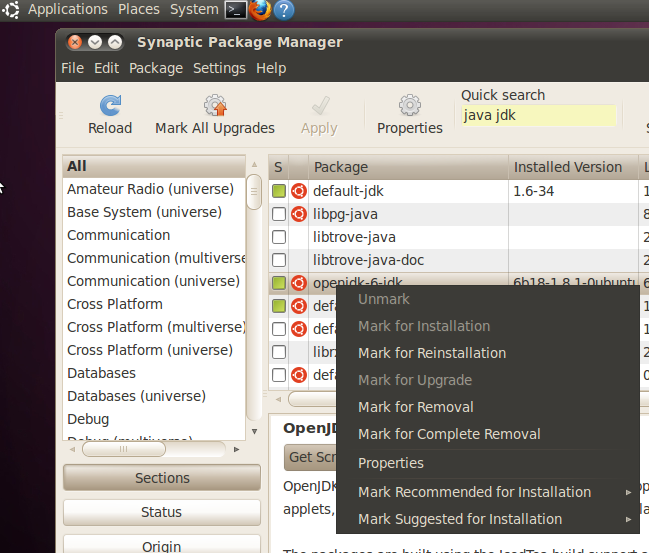
Open the synaptic package manager, enter your admin password at the prompt.

In the Quick search box type "java jdk", and then select the latest openjdk version (I've chosen 6).
Right click, and click "Mark for Installation".
Click apply.

You can test if java is installed by opening a terminal (Applications -> Accessories -> Terminal), and typing "java", and "javac". If you do not get a "command not recognised" type of response, then it's been successfully installed.
- First of all you're going to need to install Ruby. We've already installed something via the synaptic package manager, now let's try the same thing via terminal:
Type in a terminal (run a command then run the next):
sudo apt-get install ruby
sudo apt-get install rubygems
sudo gem install google-appengine

Type the following into the terminal:
appcfg.rb
If that command didn't show you a whole heap of options, then you're going to need to update your path variable to tell the system where the appcfg.rb file is:
Open the Terminal (Applications -> Accessories -> Terminal)
Type the following command to open the .bashrc file in the gedit text editor:
gedit ~/.bashrcAdd the following lines at the bottom of the file (using the path to the jruby bin folder, instead of "/new_path" - mine was /var/lib/gems/1.8/bin - it might also be in your home folder in a hidden ".gem" folder. you can always issue command "gem environment" to see where gems are installed to):
PATH=$PATH:/new_path
export PATH
Then, either log out and back it or type the following command in a terminal:
source ~/.bashrc
Follow the rest of the tutorial at http://code.google.com/p/appengine-jruby/wiki/CreateApp to create a working hello world app on AppEngine! (your webpage should say "hello" if you are successful)
Thursday, August 26, 2010
Step 1. Let's get started - Getting a virtual machine setup with linux
Step 1 -Getting a virtual machine setup with linux
Assuming you're working on Windows, let's get a Linux virtual machine going:


Downloads:
- Download virtual box http://www.virtualbox.org/wiki/DownloadsVirtualBox will let you run a virtual linux machine from your windows machine (pretty cool huh).
- Download ubuntu http://www.ubuntu.com/desktop/get-ubuntu/download
Ubuntu is a linux operating system, you can run it inside of VirtualBox, or you could even create a dual boot system on your computer (but that's outside the scope of what I'm doing sorry). - Download Daemon tools lite http://www.daemon-tools.cc/eng/downloads
This will allow you to mount your Ubuntu .iso image as if you had a CD / DVD in your CD / DVD drive.
Installation:
- Install VirtualBox - this doesn't need any explanation ;)
- Create a new Virtual Machine (VM) instance
2.1 Open VirtualBox, and click "New" to create a new VM instance.
Give your VM a name (I called mine JRubyVM), and choose Linux for the Operating System, and Ubuntu for the version.
2.2 Select how much RAM you'd like the VM to have access to (I chose ~2GB from my 4GB).
2.3 I just left the default and clicked next for this step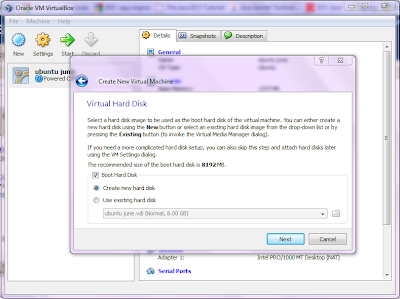
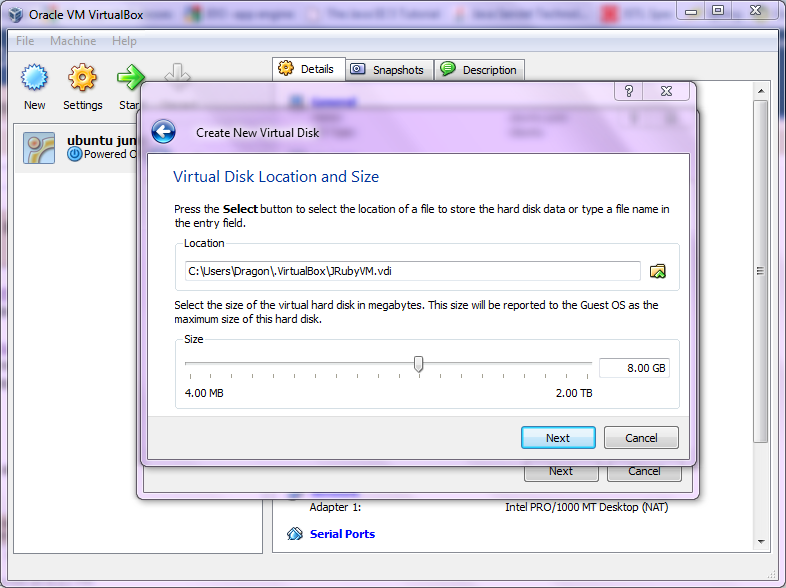
2.4 Choose dynamic if you'd like the VM hard disk space to grow if need be.
2.5 Select how much hard drive space your VM can use (I left the defaults in)
2.6 That's it, click finish and a VM instance will be created...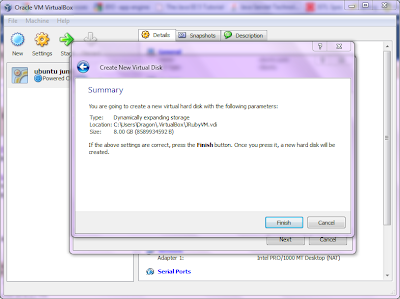
- Now let's install Daemon tools
3.1 Right click on the downloaded .exe, and click "run as administrator".
3.2 Select your language
3.3 Click next
3.4 Agree to the terms and conditions
3.5 Choose the Free License
3.6 Uncheck all the components, except maybe Desktop and Start menu components

3.7 Uncheck the checkbox to set your Browser's homepage
3.8 Click Finish.
Note: when Daemon tools lite tried to start, I got an error message saying that it may not have been installed properly. When running however, it took a while to start up, but it worked fine :) - Now mount the Ubuntu iso with Daemon tools
4.1 Open Daemon tools lite from the start menu or desktop shortcut
4.2 Right click on the Daemon tools icon, and select "Mount n Drive manager"
4.3 Click the Add image button, and find the Ubuntu .iso file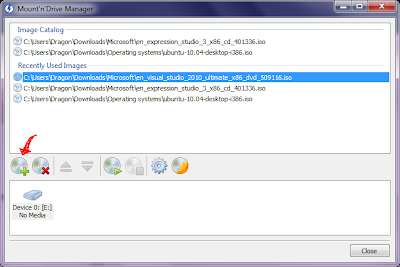
4.4 Select the Ubuntu iso image, right click, and mount the image onto the given Device
You should now have the Ubuntu image mounted. You will see if you have done this correctly by going to My Computer, and seeing if there is a virtual drive with the Ubuntu "CD" on it. - Installing Ubuntu
5.1 Start VirtualBox
5.2 Click on the machine instance created (JRubyVM), and then click "Start"
5.3 Step through the wizard, choose the drive that the Ubuntu iso image is mounted to, click Next, and you should see the Ubuntu Installer starting up.
5.4 The ubuntu setup should now be started. Run through the setup steps:
* Select your language
* Choose your location for the clock
* Choose your keyboard layout
* Prepare disk space (just click Forward)
* Create your login details
* Finally Install
Once installed it will ask you to restart. Click the restart button, and then back in windows unmount the Ubuntu iso from Daemon tools by right clicking the Daemon tools icon (in the hidden icons menu on the bottom right, on the windows toolbar), Clicking "Virtual Devices", selecting the mounted drive, and clicking "unmount".
Then push enter in the Virtual machine, and Ubuntu should start successfully. - Install VirtualBox Guest Additions
This will allow you to make the VirtualBox full screen by pushing (RightCtrl + f), or whatever host command you use instead of RightCtrl. It also allows sharing of files with windows as well. You can also look at http://tombuntu.com/index.php/2008/05/23/install-virtualbox-additions-for-an-ubuntu-804-guest/ if you have any particular issues.
6.1 On the VirtualBox Window, Click Devices -> CD/DVD Devices -> VBoxGuestAdditions.iso - make sure the cd icon shows up on the Ubuntu desktop, or try again if there are any issues with it showing up.
6.2 Open the VBoxAdditions CD from the Ubuntu desktop by double clicking
6.3 Double click the autorun.sh file, and choose to run the file. Now wait patiently for the script to run
6.3 Restart the ubuntu machine - look in the upper right corner of ubuntu for the restart option.
OK, so you should have a fully functional Ubuntu Virtual Machine operating about now! cool huh. When it starts up this time though, push (RightCtrl + f) or (HostControlKey + f), to go into fullscreen mode.
There's only one last recommendation that I'll make, which is to shut down your ubuntu machine, and to export the machine as an "appliance". To do this, on the VirtualBox window, click File -> Export Appliance... , Select your Virtual Machine, continue on with the wizard, and find a place to save your *.ovf image. Now if you wish to make another ubuntu virtual machine for some other purpose, you're already set and ready to go :)
You can also get VirtualBox images from http://virtualboximages.com/
The other recommendation I have is to set up a shared folder for sharing files between Windows and Ubuntu. Consult the VirtualBox help contents for further instruction ;)


Get out of your comfort zone
I'm a big Windows fan. I've always used Windows, it seems pretty easy for me to install stuff, to remove stuff, I know my way around... it's like my home city.
For JRuby on App Engine, I'm going to have a crack at using Open Source technologies however, and I'll document my progress, and troubles along the way.
Why JRuby, why App Engine, and why open source?
For JRuby on App Engine, I'm going to have a crack at using Open Source technologies however, and I'll document my progress, and troubles along the way.
Why JRuby, why App Engine, and why open source?
- Google App Engine is cool.
If I can write a web app and successfully deploy it, Google will do a lot of the work of scaling up my web application, so millions of people can use it. - I know Java, and JRuby sounds like it might integrate with Java.
Currently I actually have no idea about JRuby; I picked it out from a list at http://groups.google.com/group/google-appengine-java/web/will-it-play-in-app-engine, I figure that if you want to make it work, you can make it work - why not? - ThoughtWorks is interested in both Java and JRuby.
I'm trying for a job at ThoughtWorks, and I'm really hoping that I'll get the job. - It's all free.
You don't need to pay anything to use any of this technology apart from your electricity bill.
Subscribe to:
Posts (Atom)